

Until now, I always used natural light for my culinary photography, while still using a reflector to soften shadows, but I had never used LED lights. When Manfrotto suggested that I try out their latest lamp, the LUMIE, I didn’t hesitate. I was happy to try it. It was a chance for me to discover a new way of illuminating my scenes.
Presentation
I suggest you try out some presentations. This lamp comes in three different models: 3, 6 or 8 LED. I went for the last of the three, Lumie Muse, because it’s brightest and best suited to culinary photography, in my mind.
The lamp comes with 3 filters (the version 3 LEDs have 2): one is to soften and spread the intense LED light (white filter), the two others to produce a more or less warm quality of light. It also gives you the possibility of adjusting the intensity of the light emitted on 4 levels (the other 2 lamps have 3 levels).

As for size and weight, the lamp is very practical and lightweight. You can hold it in your hand just like in the photo below. It fits easily into a photo bag.

Use
You can use it in three different ways. The connector it comes with lets you put the lamp on the hot shoe of your camera’s flash as you can see below. The connector ball joint (on model 8 LEDs only) lets you change the position of the lamp’s head so you can better target a place in the scene. This is especially practical.

The other option is to place the light onto your tripod if it is fitted with a standard screw step.
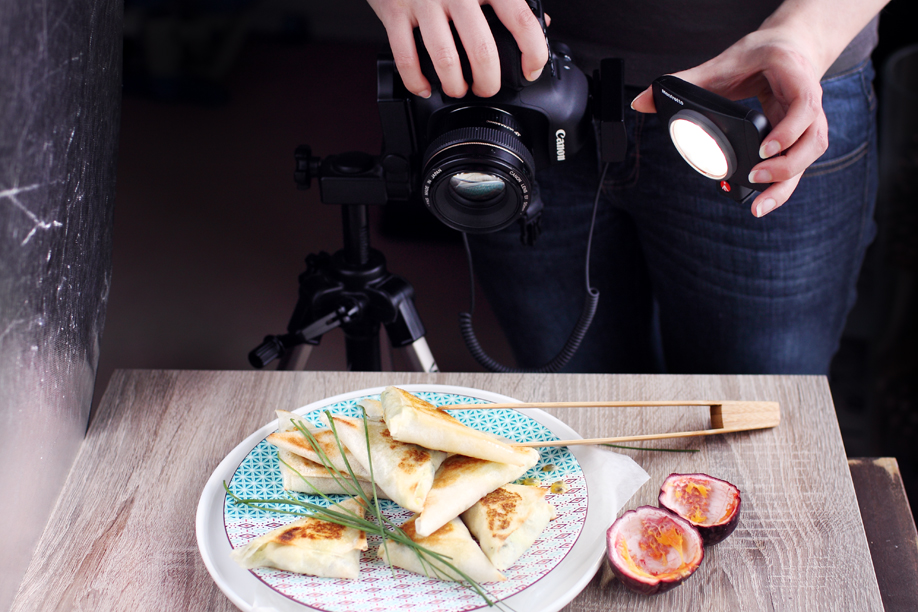
For tremendous freedom of movement, you can also simply hold it in your hand. I think that’s the best solution, especially if you usually use a tripod and remote control with your camera. That way, you can put the light exactly where you want and snap your shot from a distance. I suggest you put the lamp on a small table tripod, which will let you hold it more easily and use it like a perch.
A couple of words on filters. They are easy to set up. They fit into the dedicated support which clips onto the light. You can use up to 3 filters for additional effects.
Pictures I took to try it out
Here are some of the pictures I took so you can see the results achieved. I didn’t change my typical way of working: I always stay near a window with a reflector placed across from it. With my camera on the tripod and remote control in my hand, I could manage light the way I wanted.
When you first put the lamp in your hand, it’s best to do some tests: closer, farther away, to the left, above, with different light intensity, with or without filter… That’s how you’ll succeed in mastering this new light and understanding how it works.
Example 1
For the photo below, I needed to photograph and highlight the knives. But as you can see in the photo on the left, the light coming just from my window wasn’t enough to highlight the blades. So I used the light, putting in the white filter, and choosing the first level of light intensity. By placing it on the right side, a little above, I was able to cast the light on the blades and the grooves on one of the knives, which immediately creates a lot more visual impact!

Example 2
A slightly different use of the lamp in the image below. My idea here was to cast light onto the red currants on the bottom so I could get a a beautiful bouquet full of bubbles of light. See too how the lamp was able to unblock the background of my scene. For this photo, I used the white filter, luminosity level two, and I put the light toward the background so that only the fruit at the back would be illuminated. The fruit in front were then lit up somewhat, but it’s really the fruit at the back that catch the points of light. This way, the photo seems more magical.

Example 3
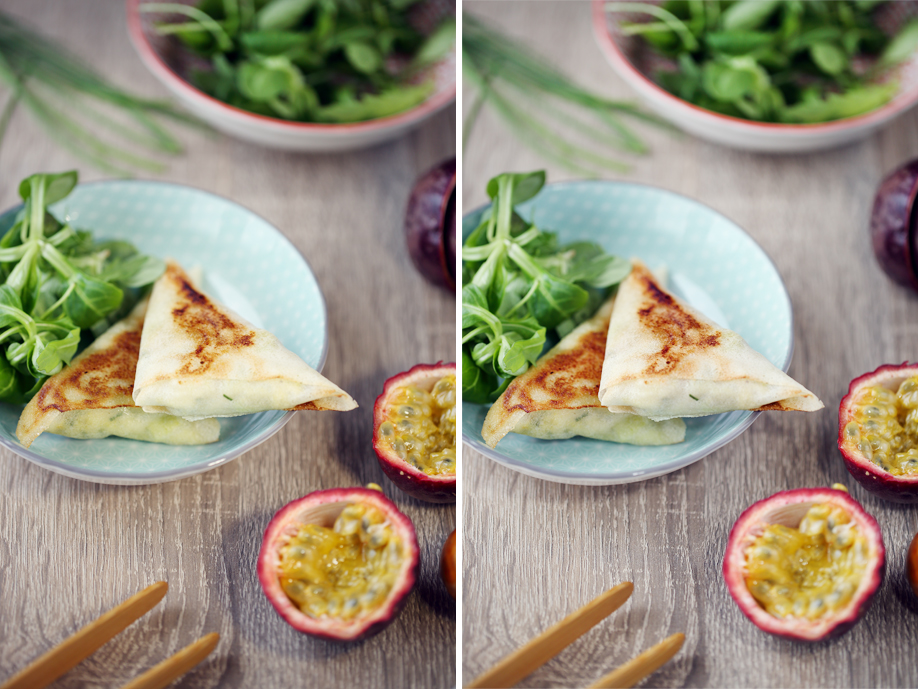
As my last example, I used light to brighten and warm up the atmosphere of my scene, since I thought it was too cold. So I put the medium filter on the LEDs, at the third level of intensity. I put the lamp at a sharp angle.
Between these two photos, you can see that the photo on the right is warmer and brighter than the one on the left. So it makes my samosas more tempting.

Tip
Be careful not to put the light too close to your scene so you don’t end up with shadows that are too pronounced and which wouldn’t seem natural. You would be able to tell right away if artificial light is used, giving a really unappetizing effect to the picture. You’ll want to move the lamp away for a much more natural result.
On the photo below, I used the same light but at a different distance. On the left, you can really see the pronounced shadows on the passion fruit. The samosas are also too bright. On the right, I moved the light away and the result is more natural and less harsh.
After trying out the different things I could do with this lamp, I believe that it really adds something to the shots I take. I don’t always need to use it for my photos, but it can help unlock those shadowy zones, to warm up an atmosphere or highlight certain products as needed. It is very practical, very easy to use and it takes up hardly any space. It’s just the right light you need for your pictures! The only drawback I would point out is that the USB power charge cable is too short.
ChefNini
Under the pseudonym chefNini, Virginie has written a culinary blog by the same name since February, 2008. She shares her recipes, technical articles, purchasing guides and test products.
Since 2011, she has offered photography, styling, and culinary creativity services.
She wrote a book on culinary photography, published by Pearson, as well as a Culinary Almanac put out by Editions 365.
Blog: http://www.chefnini.com/
Portfolio: http://portfolio.chefnini.com/
Facebook: http://www.facebook.com/chefNini/
Twitter: https://twitter.com/chefNini