

After our last photo tutorial “how to take a photo portrait of an artisan”, today we’ve got the chance to do a very different tutorial: “how to photograph a vegetable (or an object) and make it look magical”.
This isn’t strictly speaking a culinary tutorial because you can use this tip for vegetables, or objects, or even for people, and it is amazingly effective for taking an “ordinary” photo and making it a magical photo!
Or perhaps you’re saying “Nuts! Another one of these tutorials where you have to invest gigantic sums of money for professional lighting!!!”? Or perhaps “Come off it! Another one of these photo articles where you’ll need to spend hours to retouch your photos!!!”?
Don’t worry, that’s not the case at all. Today’s photo exercise is very simple and very quick to implement (you won’t have time to say “shutter speed” and it will be all done).
Two photos, a single change…that makes all the difference!
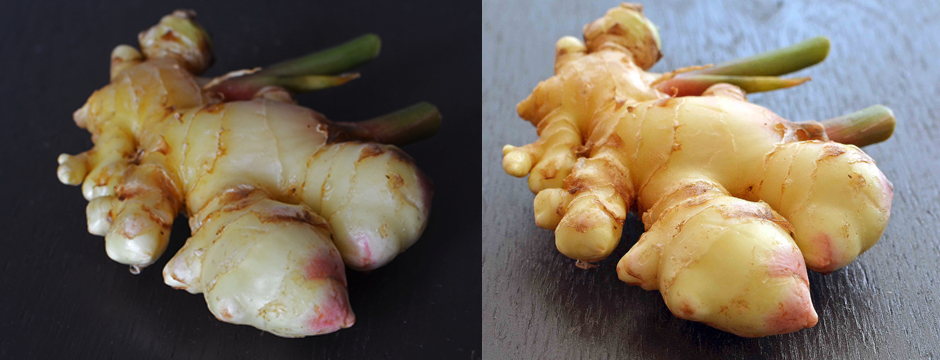
Look at the two photos below.
Which do you like better? Don’t you agree that the photo on the right has a magical quality?
But it’s exactly the same vegetable (a piece of ginger from my refrigerator), the same wood board in the background, the same setting in my living room at the same moment of the day.

So what is this unique difference?
Tadaaaaaaaaa, drum roll please…. It’s all about the light!
A “classic” vegetable photo
To take the first photo, I used a classic, or even an ordinary method: place your vegetable or your object (a flower pot in the illustration below) near a large window or a bay window and place yourself a little below the light source so you don’t block the light.

So, the vegetable (or the object) is well lit

The final result is not really, really original, but it all works.
A photo of a “magical” vegetable
Now with a big “T”, here’s our TIP of the day.
To take a magical photo, the method is just as simple and it all comes down to one hint that will make all the difference: put your vegetable or other object (in the illustration below, once again, a flower pot) near a large window or a bay window (so far, the exact same approach) BUT instead of placing yourself between your light source (the window or the bay window) and your vegetable (or other object), put yourself at the opposite side, meaning this time it’s your vegetable (or other object) that goes between you and the light source.

In a word, you’re photographing with back lighting.

Do you see how (as opposed to the first image) your photo has a magical side because of this halo of light that envelops the back of your vegetable (or your object)?
[NOTE: be careful, you don’t want to see your light source in the image background, so you’ll note that here you can only see the board in the foreground and background]
To tell you the whole story, this last photo was slightly under-exposed (I could have/should have used a reflector) so to improve the final result, I needed a few extra moments: I opened the image in Photoshop => “Images>Settings>Dark Tones/Light Tones>Dark Tones 20%”.
(Below the 2 Before/After photos)
BEFORE

AFTER

Now it’s time for some photo exercises, so you can try out this new tip! Grab a background (a tablecloth, a colored leaf, a solid color bag) as well as the first object that catches your eye, and put this photo tutorial into practice (practice makes perfect…).
I’m waiting for your feedback!
Maïeva Voyage
Maïeva Voyage is a passionate photographer who discovered photography completely by chance 5 years ago when someone gave her a camera, and it changed her life: it was a reflex camera. It was especially in Vietnam at the Photo Club of Hanoi that she developed her photographic technique.
For more than 2 years, she has been sharing her photo tips on Photo-tuto.fr, a feminine blog with fun and relaxed photo tutorials.
You’ll find Maïeva Voyage on her Photo-tuto.fr blog, but also at https://www.twitter.com/Photo_tuto_fr and at https://www.facebook.com/Blog.Photo.Tuto.Fr
Maïeva Voyage is our guest contributor for the month of July, 2014.