

Last week I introduced tilt shift in mobile photography and went on to look at the shift aspect in more detail. This week I want to expand on the tilt aspect of tilt shift and look at how the effect can be created using mobile phone cameras and apps.
Using traditional (D)SLR technology, tilting is about tilting the focal plane. It results in some really interesting effects. It is achieved ‘straight out of camera’ using specialist tilt shift or Lensbaby lenses. Unfortunately, I’m not a wealthy man so I came across the poor persons tilting technique known as freelensing.
These example images demonstrate the look we want to simulate.

Freelensing – Coffee shop

Freelensing – Rene
These images are straight out of my faithful Olympus OM10 analog camera with a 50mm lens using black and white ISO400 film.
Tilting – Key elements:
1. The most important point to note is that the focal plane is no longer flat and level with the camera body. It has tilted. Traditionally all areas roughly the same distance away from the camera in the scene would render the same level of focus or blur. This clearly is not the case.
2. Depending on the scene the out of focus areas generate wonderful bokeh (this was discussed in my first article about simulating depth of field).
3. The extent of the bokeh tends to increase with distance from the area of focus which is defined by a relatively narrow band through the image.
Each image will render the effects differently of course but for the purposes of my attempts to simulate the look these are the key elements I want to incorporate.
A note about freelensing:
I used my analog camera because freelensing as the name suggests involves detaching the lens from the camera body and tilting the lens out of alignment with the camera body. I set the lens to focus at infinity. Focusing then becomes a very manual struggle manipulated by adjusting the extent of the tilt and sometimes moving the lens slightly away from the body.
I restrict this process just to my analog camera because the film / sensor is no longer contained in a relatively sterile environment. Whilst a few bits of hair and dust may add some interest to a single analog frame, I wouldn’t want it messing up my sensor and impacting every image I take.
Simulating the effecting using a mobile phone camera:
Unlike depth of field where the mobile phone camera does afford us some ability to create a shallow depth of field straight out of camera, with the possible exception of attachments, we are entirely restricted to simulating the tilt effect with apps in post processing.
Keeping in mind the three main elements we want to achieve (together with a couple of other ‘icing on the cake’ effects) a possible workflow could look something like this (IOS apps – some are available on other platforms).
Capture and prepare a suitable image:

I normally capture using ProCamera8. Typically I will crop square and sharpen the image using both the ‘structure’ and ‘sharpen’ filters in Snapseed. The amount will vary by image but somewhere around 25pct for both normally works quite well. The process of sharpening can be quite important as it gives more detail for the next app in the process to generate authentic looking light bokeh circles.
Create a totally out of focus version:

Using AfterFocus, my preferred depth of field app I import the image and:
– Move the image out of focus my applying the maximum amount of blur
– Select a round aperture
– Select the bokeh option
At this stage if the image contains appropriate light elements some beautiful light bokeh circles should have been created. This is why I don’t simply use a tilt-shift effect app or filter. The process would be much quicker but for me the effect would appear less authentic. Certainly it would lack some elements I’ve task myself to include.
We still have to create the in focus area but before we do there is an opportunity to create a bonus effect. Looking back at our reference images it is clear that the tilt effect also distorts the bokeh circles by stretching them:

Import the AfterFocus image into Photo FX and select the ‘wide angle lens’ effect with strength adjusted to taste. This stretches the edges of the image and pulls the bokeh circles in quite a realistic manner. This effect could also be achieved in SKRWT, one of the apps I suggested when looking at simulating depth of field.
Add the focus back:

Use your own preferred layering, masking and blending app for this stage.
For me, Superimpose is used to blend the in focus and out of focus versions together. This is achieved by bringing the original image into Superimpose as the background and adding the beautiful out of focus bokeh filled image as the foreground.
Within Superimpose the two layers are automatically aligned within the transform menu by maximising the foreground over the background. Blend method should remain at the standard settings of ‘normal’ with a 100% opacity.
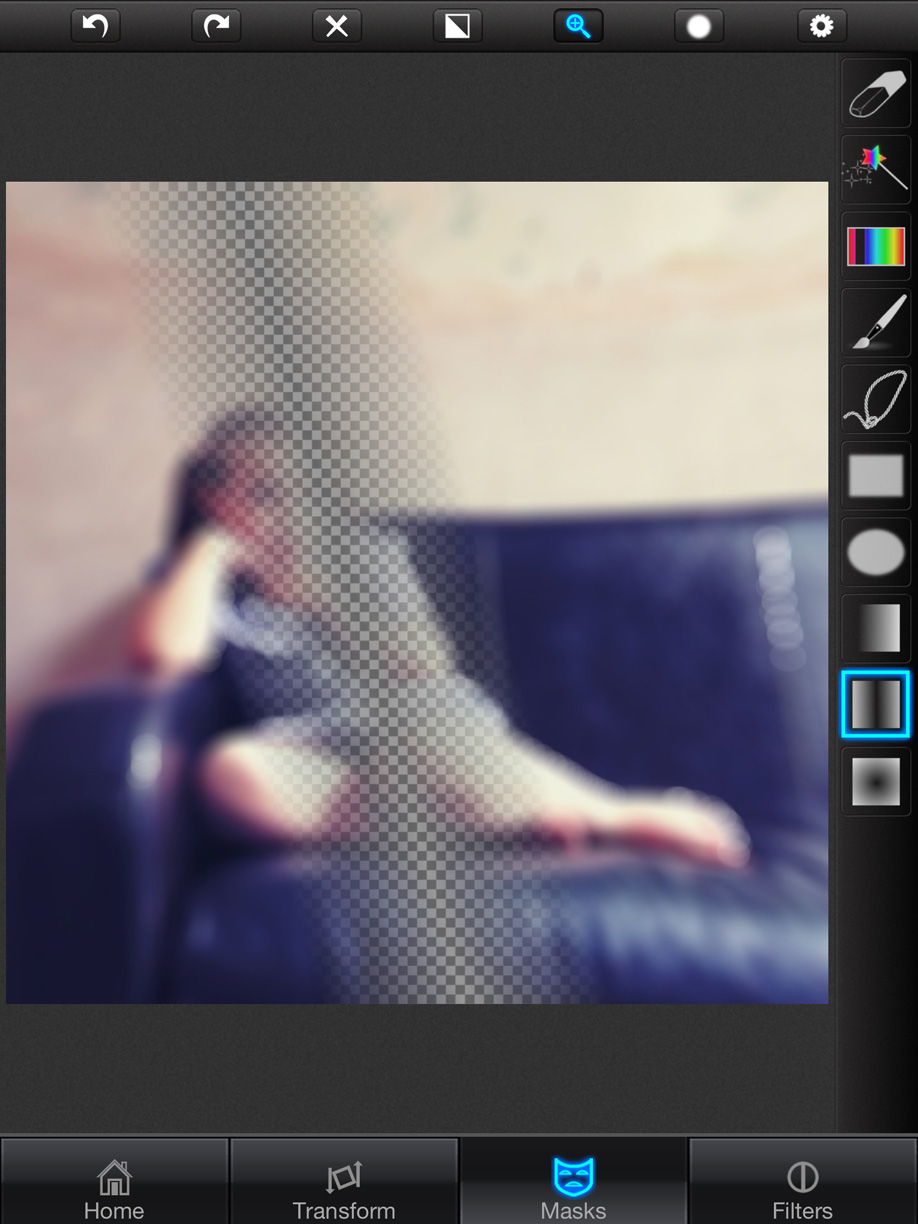
A bi-linear gradient mask is applied moving through the image defining the area we want focused. When dealing with people it’s normally a good idea to ensure at least one of the eyes in properly focused. That aside, it’s a case of using your artistic judgement to select the area in focus trying to retain the best aspects of both the area in focus and the out of focus bokeh. The extent of the gradient will also reduce the impact of bokeh circles closer to the focal area.
The following screen grab shows the mask I created:
Extra bonus tips:
1. The nature of freelensing means that dirt and light leaks are very possible. This type of image may well suit the addition of some of these effects. I tend to use Mextures for this.
2. The ISO400 black and white film I used can be simulated with a black and white conversion. For this image I first used the standard drama filter to enhance detail and contrasts and then converted to black and white using the standard ‘film’ preset but with grain adjusted down to 25pct.

The finished image with a simulated freelensing effect.
There are other methods that could be employed to generate this effect. One possible alternative workflow is highlighted in an article on my own blog.
Skip
Known as Skip to friends, Paul is an exhibited, commissioned and prize winning iPhone photographer from Lincoln, England. He runs his own successful blog at skipology.com outlining the apps and processes involved in creating his images. His style ranges from low edit street shots to highly textured / painterly composites all created using only the iPhone and iPad. Socially, connect with Skip on Facebook at www.facebook.com/skipology Instagram at instagram.com/skipology or Twitter at twitter.com/skipology